Documenation
What is SSH?
Secure Socket Shell (SSH abbreviated) is a technology widely used for securely access computer, server or any other device running SSH server (like SAT receiver, NAS, Raspberry Pi etc.) over unsecure networks/internet or LAN. SSH term is used for naming both a network protocol and a set of utilities supporting it. SSH has become a defacto standard for terminal remote access and replaced a lot of old programs/protocols like telnet, rlogin, rsh, ftp and others.
From client side SSH looks very similar to telnet or other remote terminal, after authentication user is able to execute commands, perform file operations and other actions on remote device like he is locally logged in into terminal session. Also SSH offer some additional features like secure files transfer using SFTP (SSH file transfer protocol) and SSH tunneling. However unlike telnet, all communication between SSH client and SSH server are protected with strong encryption.
Linux distributives have SSH support which could be enabled on system installation or added later, so almost every device running Linux is SSH capable in theory. For Windows there are a bunch of third party tools (including our Persistent SSH tunnel manager for SSH tunneling), also recently Microsoft added basic SSH command line tools into Windows 10 and Windows Server 2019.
How SSH works?
The basic SSH use is remote terminal session. On Linux systems this can be achieved by the following command:
At first, SSH client will try to verify server identity using server public key in order to avoid attacks based on server spoofing. In Linux, public keys of all trusted hosts are stored in ~/.ssh/known_hosts file. When you connecting to the SSH server first time, its public key is not known and therefore you will be asked to add it:
If you answer 'yes', this server public key will be added to the known_hosts file and connection process will move on to authentication phase. For maximum security before answering 'yes' you should check that fingerprint shown corresponds to actual server key fingerprint.
SSH protocol provides two authentication methods: password and private/public key pair and each of then has own pros and contras. Password method works exactly the same as user/password login works everywhere, after checking server identity you will be asked for password and then password will be sent to the server over encrypted SSH connection. All well known vulnerabilities of password authentication (weak passwords, same password for many servers etc) are valid in case of SSH, except that password will not be sent over unencrypted connection. With public authentication, user public key should be first transferred to SSH server, in Linux this is done with this command:
After this you can authenticate in SSH session without password using your private key. For additional security user private key may be password protected, in this case you will need to enter key password each time you use it. Most of SSH servers allows to disable password authentication and use only public key method. Very often user private key does not have password set, and this is the most obvious possible problem with key based authentication. If intruder gets access to the key file (hack, malware, device was lost or stolen, there are a lot of ways for this), he will be able to login to every SSH server where corresponding user public key was installed until this public will be removed or replaced on each server.
What is SSH tunnel?
One of the new SSH features in comparison to old remote terminal programs like telnet is SSH tunnels. SSH tunnel allows to transfer almost any kind of TCP/IP traffic within encrypted SSH connection. This is useful for VPN, accessing legacy applications, accessing intranet services and servers (MySQL/MariaDB or other database servers for example) from unsecure network and through firewalls and so on.
Below is diagram illustrating how SSH tunnel works:
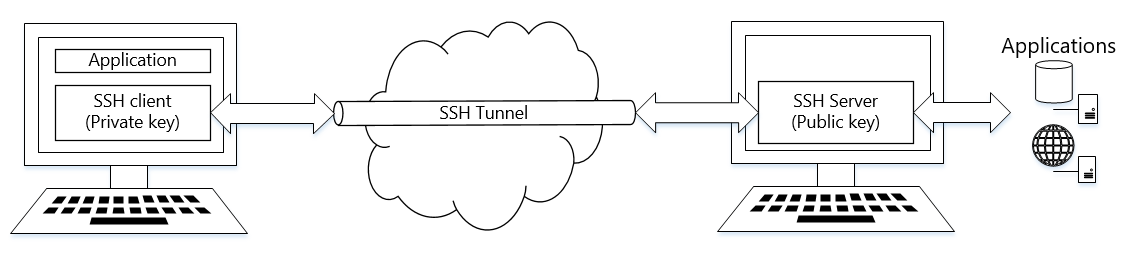
The typical example of SSH tunnels use is access to production database server on remote hosting. Due to security reasons those servers are always bind to localhost only (if your server listens on available IPs you should reconsider this as soon as possible) and therefore they are not accessible from outside. However if on this database server you also have an SSH server software installed, than there is a way to access this database server from anywhere without security implications (if you keep password and private key safe of course).
The command to create SSH tunnel from localhost to remote MySQL server will be:
This will forward remote port 127.0.0.1:3306 on my-sql-server.com to local port 3306 on SSH client and therefore remote MySQL server that listens only on 127.0.0.1:3306 will be accessible on SSH client. If port 3306 is already busy by local MySQL instance you may choose different local port, 3307 for example:
All said above about how SSH checks server identity and authentication methods is also apply to SSH tunnels.
Persistent SSH tunnel manager
First of all, SSH came from Linux world and till recent times has no native support on Windows systems. Using ssh on Windows requires installing and/or compiling some Linux tools, like SSH itself, Cygwin & autossh or Windows tools like Putty and so on. Recently Microsoft has added a command line SSH tool into Windows 10 which is a good news but this is still just a command line tool.
So, why you may need Persistent SSH tunnel manager instead of bunch of other tools and scripts?
Always on
Persistent SSH tunnel manager works as Windows system service. All your SSH tunnels become available immediatelly after Windows startup and will work even if no user logged in.
Always connected
Persistent SSH monitors SSH channels and restart them if channel becomes inoperable (connection loss, SSH server restart etc). Most of the other existing tools lacks this feature and in case of connection loss or other failures your SSH channel will be offline until you manually restart it.
Easy management using web browser
What if you have a few or more tunnels which you need always online? You can easy manage your SSH tunnels using Persistent SSH web admin panel. It can be accessed from anywhere with any modern browser.
Persistent SSH installation
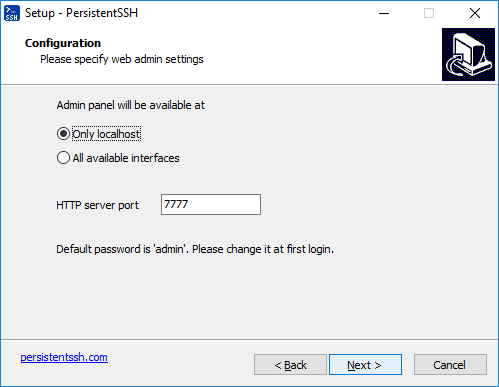
It is simple. Download distributive from our site, run it and follow the instructions. During installation you will be asked about admin web availability (local only or all interfaces) and port:
Installation process will install Persistent SSH Windows service and all necessary files. Service will start working immediatelly after installation finishes.
Important note:
Please do not forget to login into web admin panel and change default password (which is 'admin') after installation.

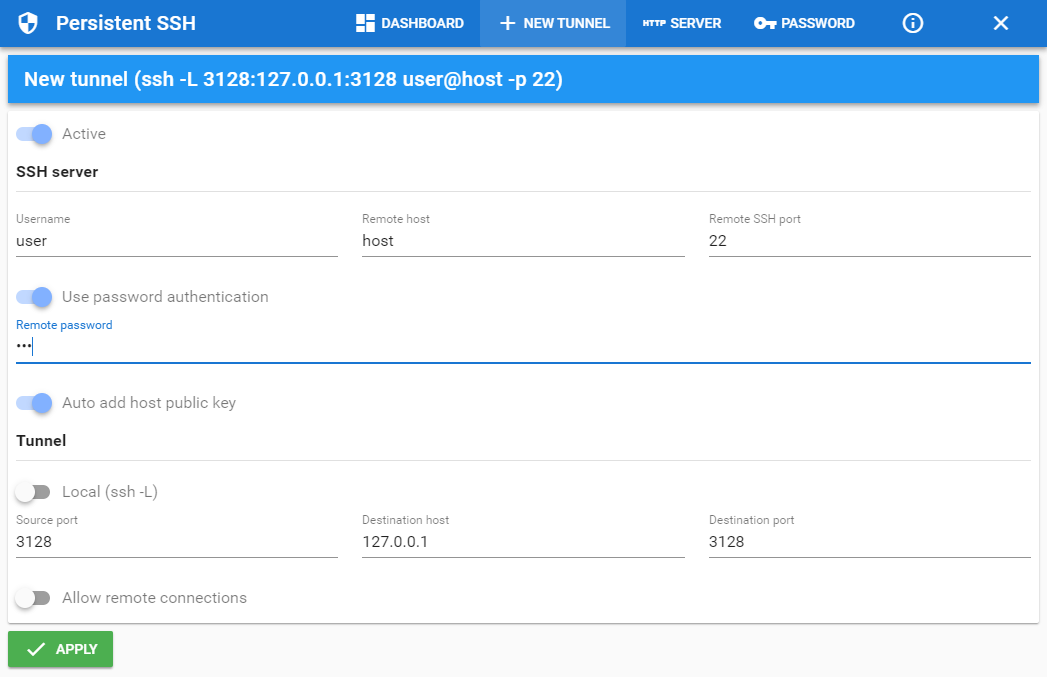
Creating SSH tunnel
Press + NEW TUNNEL and create your new local or remote SSH tunnel with your desired settings (please note that private key authorization is available only in Standard and Professional editions):
Frequently asked questions
Q: I lost my password to web admin console, how do I reset it?
Important!
Please note that this will also reset all SSH tunnels settings including passwords and private keys.
- Open Computer Management
- Select Services and Applications | Services on left side
- Find Persisten SSH service and open its properties (double click or right click and then Properties)
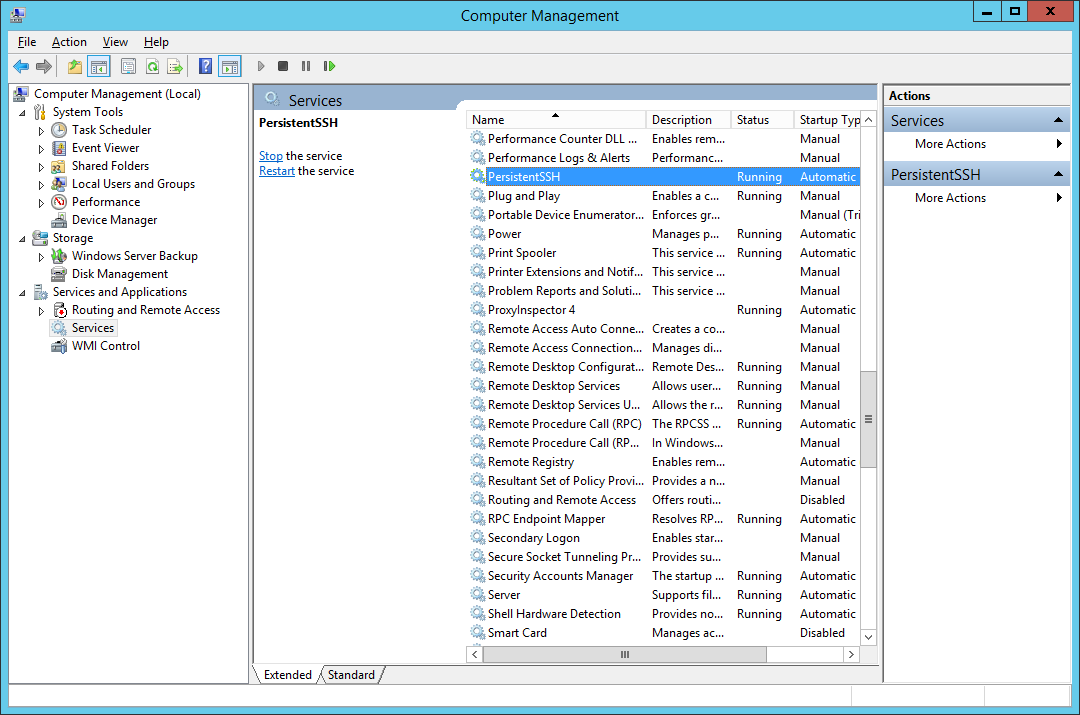
- Stop service by pressing Stop button
- In Start parameters field enter: /resetpwd
- Start service by pressing Start button
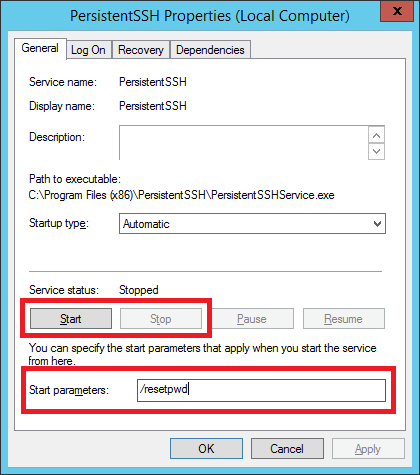
This will reset password to a default one: 'admin'.
Q: How to configure access using HTTPS to Persistent SSH tunnel manager web admin console
If you need to access your Persistent SSH installation over internet, using HTTPS instead of HTTP is safest and strongly recommended method. HTTPS server requires SSL certificate which can be obtained in two ways:
Purchase it from one of well known certificate providers like ssls.com, sectigo.com and others. Prices starting from about $5 per year. In this case you only will need to setup path to certificate and private key files received from certificate authority in Persistent SSH.
Create SSL certificate by yourself. This is free of charge but you will need to install it on client devices from which you access Persistent SSH tunnel manager.
First, generate certificate using OpenSSL toolkit:
You will be asked a few questions, but the really important one is Common name(FQDN), in this field you need to enter domain name by which you will access your Persistent SSH admin web console.
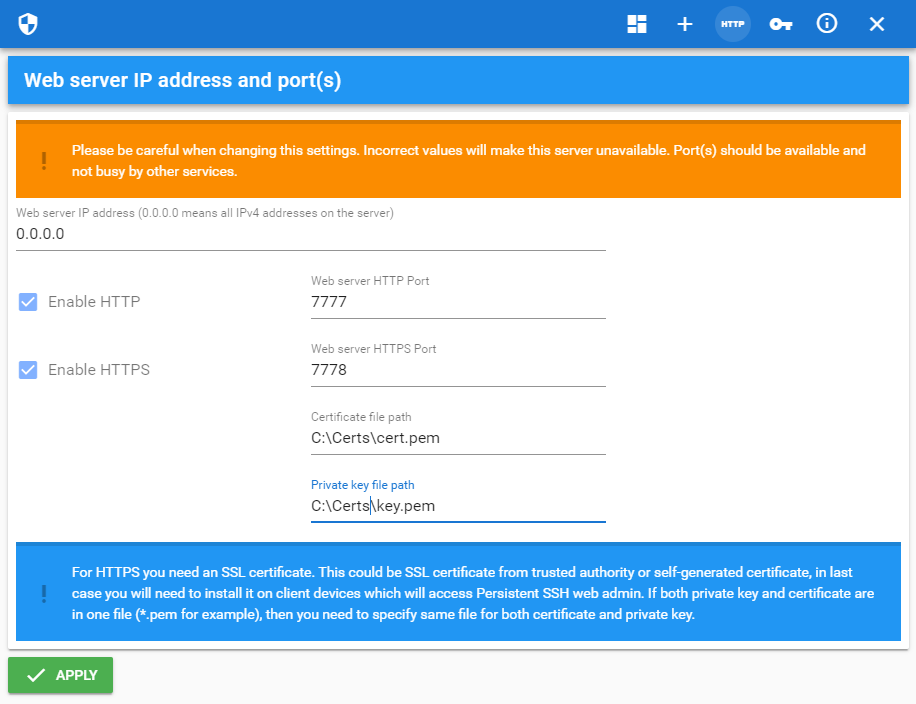
For now Persistent SSH support only private key without password so you need to store it under safe path with limited access rights. In Persistent SSH tunnel manager admin console go to HTTP Server, check Enable HTTPS and enter path to certificate and private key files, then press Apply.
To avoid browser warnings like shown below you need to install certificate on each device (This recipe does not work for all browsers, some browsers like Chrome require certificate with Subject Alternative Names, please take a look here):

In order to install certificate on Windows 8/10 computers you need to convert it to Microsoft Windows supported format using following command:
After this:
Open mmc.exe
Select File and click Add/Remove Snap-in…
Select the Certificates snap-in, and click Add >
Select Computer account, and click Next
Select Local computer and click Finish
Save console by pressing OK
If the left pane expand Cerfificates (Local computer)
Right-click on Trusted Root Certification Authorities and select All tasks -> Import
Select your cert.pfx file and proceed with installation
Version history
1.2.831 (16 July 2019)[*] Misc security improvements
1.2.731 (10 May 2019)
[+] HTTPS support in registered versions
[*] Minor fixes
[+] Added support for private keys in Putty format
[+] Description property for each tunnel
Initial release